

FAQ - Kilter Board
Getting Started with Kilter Board
New to the Kilter Board? Start with our Kilter Board Overview Page to get familiar with everything you need to know.
Kilter Board FAQ
What Size Kilter Board Should I Choose?
Kilter Boards come in many shapes and sizes. We recommend the 16' x 12' adjustable Kilter Board Original Layout if space allows. Choosing a Kilter Board layout can depend on a number of factors and we are happy to set up a call to talk more about which options would be best for your space, budget, and climbing goals. Alternatively, please see below for charts based on board sizes/layouts. For more information contact Kiel at holds@kiltergrips.com.
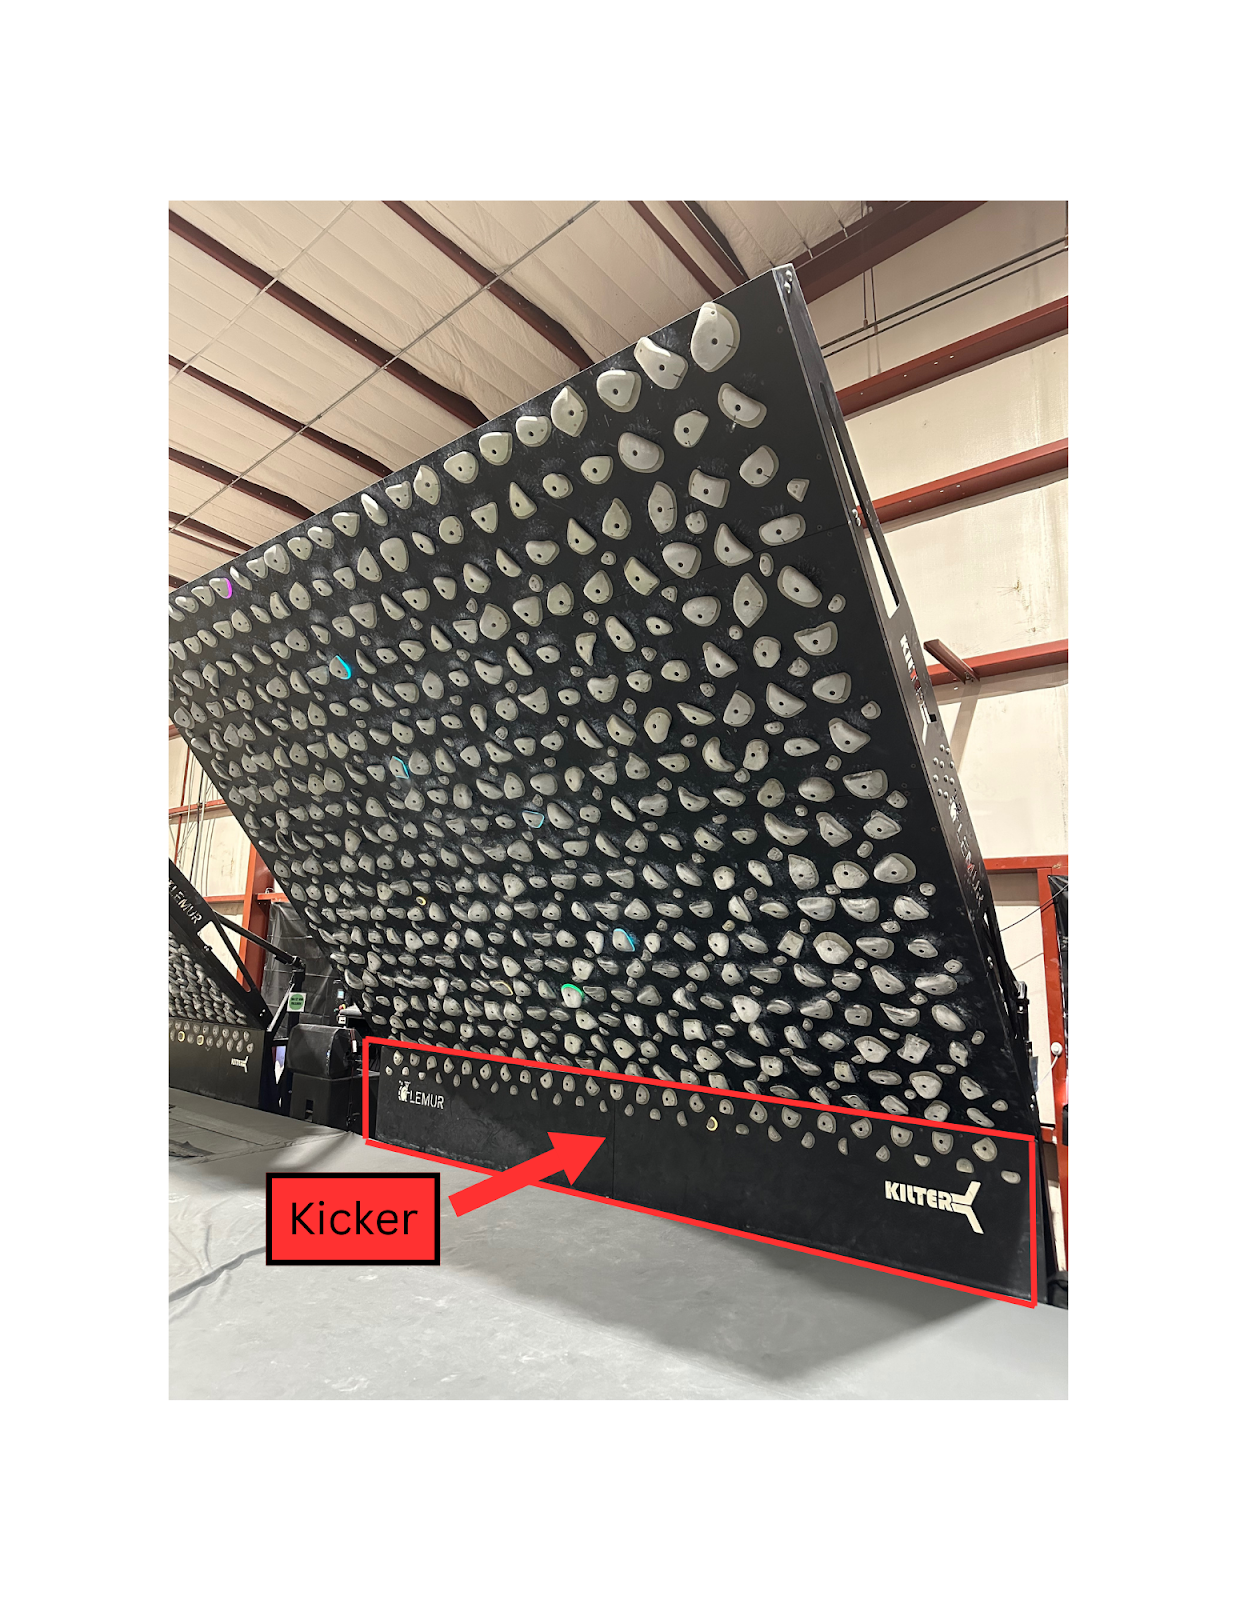
Chart Below shows the clearance height needed for each size of the OG Layout board based on the angle the wall is at. These calculations assume a 39” kicker is installed. If a different kicker size is installed or planned then please adjust accordingly (i.e. 27” kicker means the clear height for a 16x12 OG Layout would be 171.0 inches).
|
Sizes |
0º |
5º |
10º |
15º |
20º |
25º |
30º |
35º |
40º |
45º |
50º |
55º |
60º |
65º |
70º |
|
16x12 |
183.0 |
182.5 |
180.8 |
178.1 |
174.3 |
169.5 |
163.7 |
157.0 |
149.3 |
140.8 |
131.6 |
121.6 |
111.0 |
99.9 |
88.3 |
|
12x12 |
183.0 |
182.5 |
180.8 |
178.1 |
174.3 |
169.5 |
163.7 |
157.0 |
149.3 |
140.8 |
131.6 |
121.6 |
111.0 |
99.9 |
88.3 |
|
8x12 |
183.0 |
182.5 |
180.8 |
178.1 |
174.3 |
169.5 |
163.7 |
157.0 |
149.3 |
140.8 |
131.6 |
121.6 |
111.0 |
99.9 |
88.3 |
|
7x10* |
130.0 |
129.5 |
128.2 |
125.9 |
122.8 |
118.8 |
113.9 |
108.3 |
101.9 |
94.9 |
87.1 |
78.8 |
70.0 |
60.7 |
51.0 |
*Assumes empty 10” kicker
Chart Below shows the clearance height needed for each size of the Fullride Layout board based on the angle the wall is at.
|
Sizes |
0º |
5º |
10º |
15º |
20º |
25º |
30º |
35º |
40º |
45º |
50º |
55º |
60º |
65º |
70º |
|---|---|---|---|---|---|---|---|---|---|---|---|---|---|---|---|
|
10x12 |
171.0 |
170.5 |
168.8 |
166.1 |
162.3 |
157.5 |
151.7 |
145.0 |
137.3 |
128.8 |
119.6 |
109.6 |
99.0 |
87.9 |
76.3 |
|
8x12 |
171.0 |
170.5 |
168.8 |
166.1 |
162.3 |
157.5 |
151.7 |
145.0 |
137.3 |
128.8 |
119.6 |
109.6 |
99.0 |
87.9 |
76.3 |
|
10x10* |
130.0 |
129.5 |
128.2 |
125.9 |
122.8 |
118.8 |
113.9 |
108.3 |
101.9 |
94.9 |
87.1 |
78.8 |
70.0 |
60.7 |
51.0 |
|
7x10* |
130.0 |
129.5 |
128.2 |
125.9 |
122.8 |
118.8 |
113.9 |
108.3 |
101.9 |
94.9 |
87.1 |
78.8 |
70.0 |
60.7 |
51.0 |
*Assumes empty 10” kicker
Note: Sizes are listed as width x height. For example, an 8' x 12' board is 8 feet wide and 12 feet tall. All 12' tall versions include a kicker/kickboard. This is the vertical, non-adjustable panel as shown in the picture above.
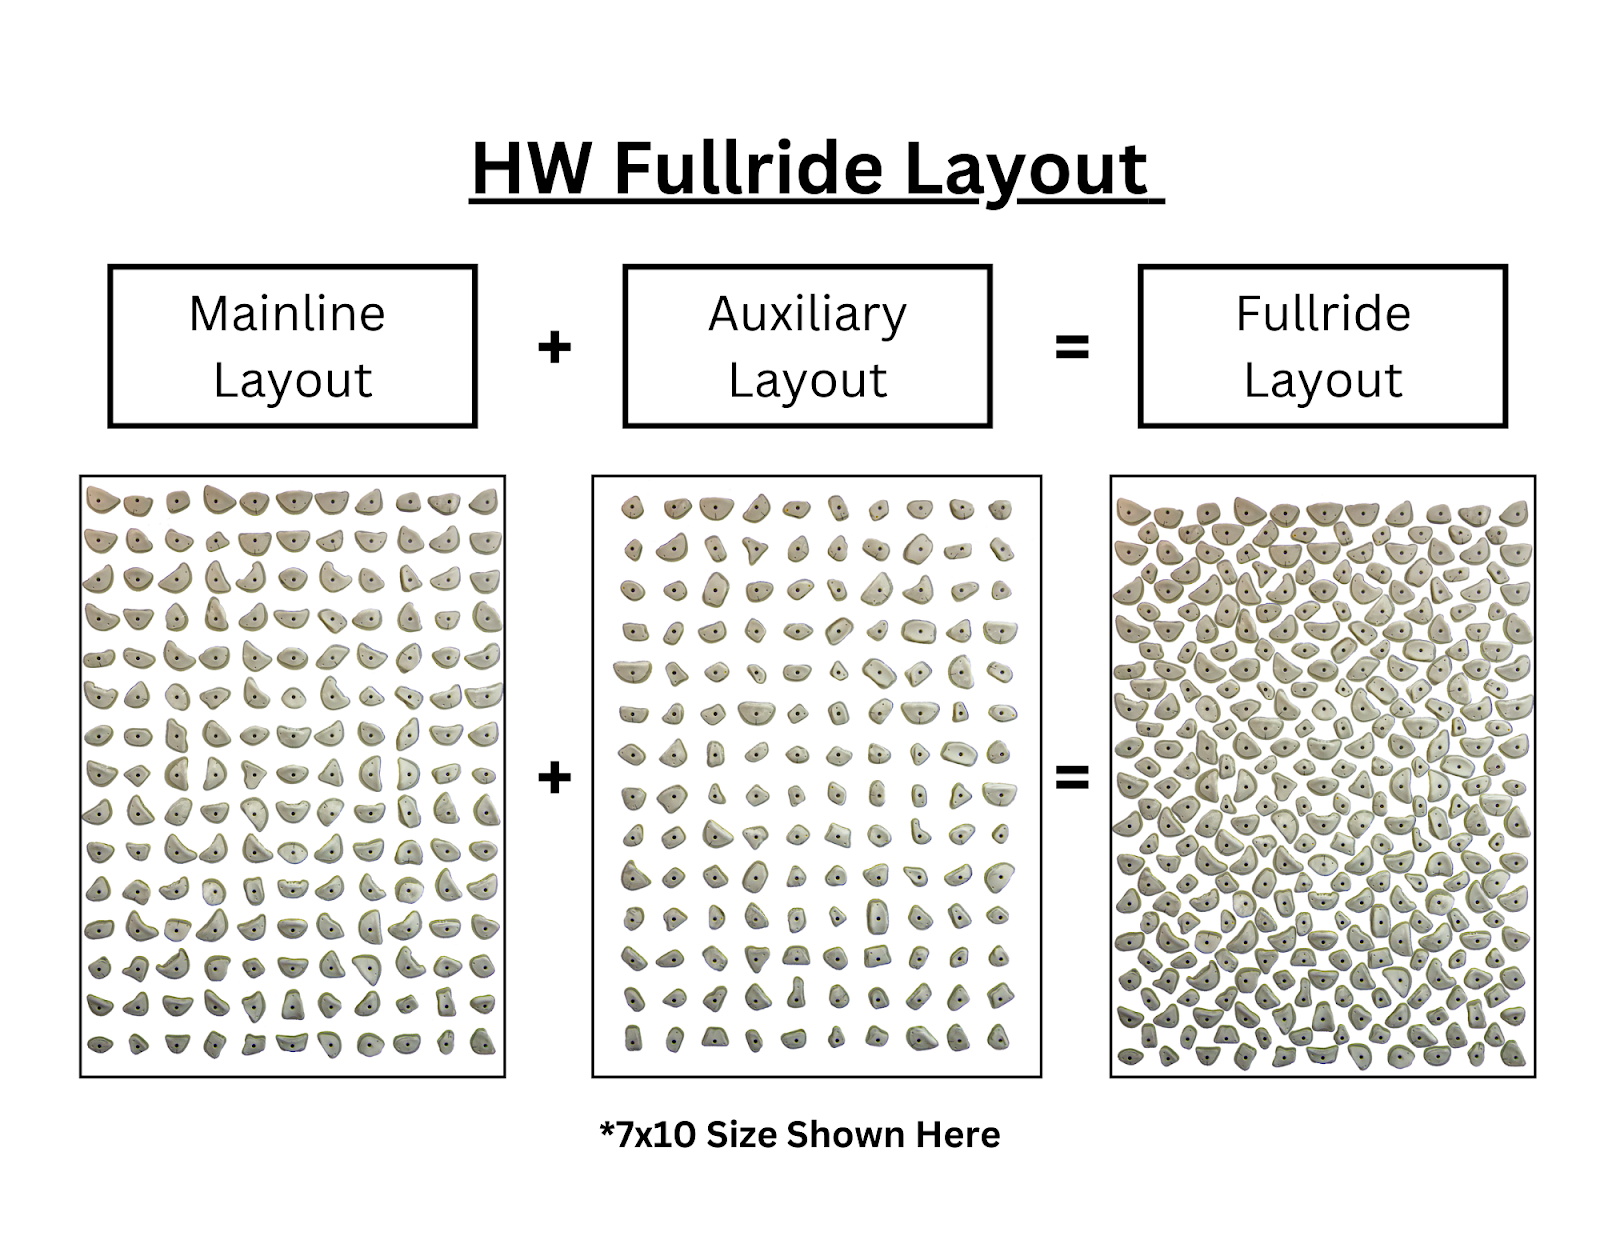
What is the HW Fullride Layout?
The HW Fullride Layout offers two complementary configurations:
-
We recommend the Fullride is the combination of the Mainline and Auxiliary layouts
-
For limited budgets the Mainline is a great starting point
-
Add the Auxiliary layout later for a denser, more versatile board, and greater access to the database.
Expansion Packs:
-
The HW Fullride layout is made up of two hold packs, allowing users to expand their board as their budget and space allow.
-
No surcharge applies for upgrades
-
The Kilter Board App is customizable to your specific board size and layout
What About the Original Kilter Board Layout?
The Original Layout is the most popular option, especially for gyms. Key benefits:
-
Fully adjustable frame allows climbers of all abilities to use it.
-
Intuitive light-up holds make it accessible to beginners, kids, and groups.
-
Advanced climbers remain challenged at steeper angles (45°-60°).
Why Choose the Original Layout?
-
Gyms: A proven choice that appeals to climbers of all levels.
-
Training versatility: The adjustable frame allows users to target technique, power, or endurance.
-
Community: The Original Layout has an extensive online community with thousands of shared problems.
Gyms report that the Original Layout Appeals to everyone—from new climbers on lower angles to experts on steeper setups—making it a versatile choice for your entire customer base.
What About Texture on the board panels?
The Kilter Board was designed with no texture on the panels. However, there are textured Kilter Boards in use around the world.
Why Avoid Texture?
-
Durability: Texture can wear down over time and require maintenance.
-
Consistency: Smooth boards provide a more uniform experience across holds and surfaces.
-
Climbing Shoe Preservation: Smooth boards are gentler on climbing shoes.
If you are still interested in texture, we can discuss the pros and cons further during your planning process.
How Long Does Installation Take?
The times frames listed below are for installing the holds and lights:
-
Fullride Boards: 1-2 days with 2-3 people.
-
OG Boards: 1-2 days with 2-3 people.
If you are also installing frames, panels and padding - this will include an additional 2 to 3 days.
We offer panels that have all of the hold locations and compass orientations pre-marked, and t-nuts installed. So, when it comes to setting (or resetting after cleaning) the board, one simply needs to find the numbered Kilter Board hold, match it up with the corresponding t-nut or LED location, and turn it to match the compass mark. This saves a considerable amount of time (approximately 30 hours per board based on recent stats) and labor costs, compared to the analog method of transferring each hold’s number and direction from the setting sheet to the board by hand.
Alternatively, we offer full service White Glove Installation in North America at an additional cost.
We provide comprehensive installation instructions, and you can contact us for further guidance or professional installation services.
How Much Does a Kilter Board Cost?
The cost of a Kilter Board system varies depending on the size and options you choose. Here’s a general price range to help you plan:
-
HW Fullride Kilter Board (Holds and LEDs): 7’x10’ starts at $5,000 (excluding frame, panels, mats, shipping, and installation).
-
OG Kilter Board (Holds and LEDs): 7’x10’ starts at $7500 (excluding frame, panels, mats, shipping, and installation).
-
Kilter Board Bundles (Pads + Adjustable Frame): Prices vary significantly based on size and customizations, ranging from $14,000 to $75,000+.
You can view the basic pricing structure and place a deposit for both the Original Kilter Board and the HW Kilter Board on our website. Please note:
-
Prices do not include the frame, panels, mats, shipping, or installation.
-
These costs will give you a good starting point for budgeting.
Planning a bigger project or need assistance? Click here to get in touch and let’s start the conversation.
Have any other questions?
Reach out to us:
-
Email: holds@kiltergrips.com
-
Call Kiel: 720-456-0543
Kiel can help you:
-
Discuss your space and make size/frame recommendations.
-
Plan for padding, installation, and other requirements.
-
Answer any questions you have about getting started.
Let’s make your Kilter Board project a success!